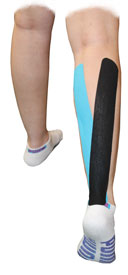
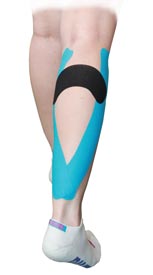
How to Tape Injuries

Taping the Leg

Content:

If you are experiencing leg pain or a leg injury, taping the affected area can provide you with much needed relief. Whether you have Shin Splints, a Calf Muscle Tear, a Quad Muscle Strain or a Hamstring Injury, tape can give your soft tissue the support and protection it needs.

Since tape works to limit your range of motion, this helps to prevent injury as well as re-injury. Make applying tape to your problem areas a new part of your pre-game or pre-workout preparation. Tape is especially effective during times when you’re being physically active.

It makes your skin and tissue more rigid and less elastic, but it is still soft, light and comfortable to wear. Tape also provides you with compression while you wear it, which helps to relieve swelling.

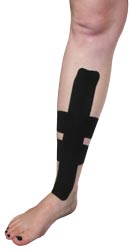
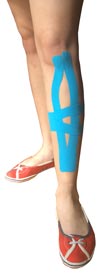
Shin Splint Taping

Taping Shin Splints

Option 1

  1. Locate the point of pain on your shin, as you will be taping directly over it.
  2. Take 1 full length strip of tape (about 10 inches) and tear the backing off one end, anchoring it at the bottom of your shin, just above your foot.
  3. Pull the tape up the length of your shin with 50% stretch, ensuring that you are covering the point of pain.
  4. Place the other end of the tape down with no stretch and rub it into your skin.
  5. Take another full length piece of tape and cut it in half, rounding the corners. This should give you two pieces that are each about 5 inches in length.
  6. Take one of the 5 inch strips and tear the backing off one end, anchoring it horizontally above your point of pain.
  7. Pull the tape horizontally across your shin with 80% stretch, placing the other end down with no stretch.
  8. Take the other 5 inch strip and tear the backing off one end, anchoring it horizontally just below your point of pain.
  9. Pull the tape horizontally across your shin with 80% stretch, placing the other end down with no stretch.
  10. Rub the tape in to ensure sticking.
Shin Splint Taping

Taping Shin Splints

Option 2

  1. Take one full length piece of tape (about 10 inches long) and cut it two thirds of the way down the center to make a "Y" shape.
  2. Tear off the backing on the un-cut end of the tape and anchor it about 3 inches below your point of pain, using no stretch.
  3. Using about 15-25% stretch, pull one of the "Y" arms up and around your point of pain, laying the end down with no stretch.
  4. Pull the opposite "Y" arm up and around your point of pain, again using 15-25% stretch.
  5. Lay down the end of the strip with no stretch, ensuring that the "Y" arm isn't touching the other "Y" arm.
  6. Take another full length piece of tape (about 10 inches long) and cut it two thirds of the way down the center to make a "Y" shape.
  7. Tear off the backing on the un-cut end of the tape and anchor it on the side of your calf horizontally so it's directly in line with your point of pain.
  8. Peel the backing off the lower "Y" arm and use 100% stretch to pull it right below your point of pain.
  9. Using no stretch, angle the tape upwards slightly and apply it up the back of your calf (you want to avoid going all the way around your leg).
  10. Peel the backing off the upper "Y" arm and use 100% stretch to pull it above your point of pain.
  11. Using no stretch, angle the tape upwards slightly and apply it up the back of your calf (you want to avoid wrapping it all the way around your leg).
  12. Rub the tape in to ensure sticking.
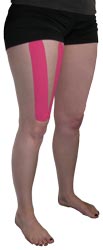
Quad Taping

Taping the Quads

Option 1

  1. Take a full length piece of tape (about 10 inches long) and tear the backing off one end.
  2. Anchor the tape to the distal (far) end of your quad muscle using no stretch.
  3. Remove the rest of the backing and, using 25% stretch, apply the tape up the length of your quad.
  4. Lay down the end of the tape with no stretch.
  5. Take another full length piece of tape and tear the backing off one end.
  6. Using no stretch, anchor the tape right beside where you anchored the first piece.
  7. Remove the rest of the backing and, using 25% stretch, apply the tape up the length of your quad, angling it away from the other piece to form a "V" shape.
  8. Lay down the end of the tape with no stretch.
  9. Rub the tape in to ensure sticking.
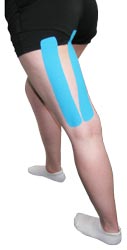
Quad Taping

Taping the Quads

Option 2

  1. Take a full length piece of tape (about 10 inches long) and tear the backing off one end.
  2. Anchor the tape to the distal (far) end of your quad muscle using no stretch.
  3. Remove the rest of the backing and, using 25% stretch, apply the tape up the length of your quad.
  4. Lay down the end of the tape with no stretch.
  5. Take another full length piece of tape and cut it in half, rounding the edges, so you have two pieces that are each about 5 inches long.
  6. Take one of the 5 inch strips and tear the backing in the middle, peeling it away so you are holding onto the two anchor ends.
  7. Using 100% stretch in the middle and no stretch at the ends, apply the tape horizontally over your point of pain.
  8. Take the other 5 inch piece of tape and tear the backing in the middle, peeling it away so you are holding onto the two anchor ends.
  9. Using 100% stretch in the middle and no stretch at the ends, apply the tape over your point of pain so it makes an "X" shape with the other 5 inch strip you applied.
  10. Rub the tape in to ensure sticking.
Hamstring Taping

Taping the Hamstrings

Option 1

  1. Take a full length piece of tape (about 10 inches long) and tear the backing off one end.
  2. Using no stretch, anchor the torn end of the tape to the inside of your leg, just above the back of your knee.
  3. Remove the rest of the backing and pull the tape up the back of your hamstring using 25% stretch.
  4. Lay down the end of the tape with no stretch.
  5. Take another full length piece of tape and tear the backing off one end.
  6. Using no stretch, anchor the torn end of the tape right beside where the first piece was anchored, right above the back of your knee.
  7. Remove the rest of the backing and, using 25% stretch, pull the tape up the length of your hamstring and angle it out to form a "V" shape with the first piece.
  8. Lay down the end of the tape with no stretch.
  9. Rub the tape in to ensure sticking.
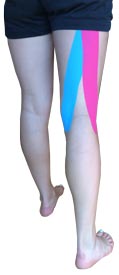
Hamstring Taping

Taping the Hamstrings

Option 2

  1. Take a full length piece of tape (about 10 inches long) and tear the backing off one end.
  2. Using no stretch, anchor the torn end of the tape at the very top of your thigh.
  3. Remove the rest of the backing and pull the tape down the inner portion of your thigh and angle it around to your knee using 25% stretch.
  4. Lay down the end of the tape with no stretch.
  5. Take another full length piece of tape and tear the backing off one end.
  6. Using no stretch, anchor the torn end of the tape right beside where the first piece was anchored.
  7. Remove the rest of the backing and pull the tape down the outer portion of your thigh, angling it around to your knee using 25% stretch.
  8. Lay down the end of the tape with no stretch.
  9. Rub the tape in to ensure sticking.
Calf Muscle Taping

Taping the Calf Muscles

Option 1

  1. Place your calf on stretch.
  2. Take a full length piece of tape (10 inches) and tear the backing off one end.
  3. Anchor the tape to the back of your ankle with no stretch.
  4. Peeling the paper backing off as you go, apply the tape up the length of your calf using 25% stretch.
  5. Lay down the end of the tape with no stretch.
  6. Take another full length piece of tape and tear the backing off one end.
  7. Anchor the tape beside the first piece with no stretch.
  8. Peeling the paper backing off as you go, apply the tape up the length of your calf using 25% stretch to create a "V" with the first piece.
  9. Lay down the end of the tape with no stretch.
  10. Rub the tape in to ensure sticking.
Calf Muscle Taping

Taping the Calf Muscles

Option 2

  1. Place your calf on stretch.
  2. Take a full length piece of tape (10 inches) and tear the backing off one end.
  3. Anchor the tape to the back of your ankle and, using no stretch, apply it up and around your calf muscle.
  4. Take another full length piece of tape and tear the backing off one end.
  5. Anchor the tape beside the first piece and, using no stretch, apply it up and around your calf muscle to create a "U" with the first piece.
  6. Take a 5 inch strip of tape (half of a full length piece) and tear the backing in the middle, peeling it away so you are holding onto the two anchor ends.
  7. Apply the tape horizontally over your point of pain with 50% stretch in the middle and no stretch at the ends.
  8. Rub the tape in to ensure sticking.