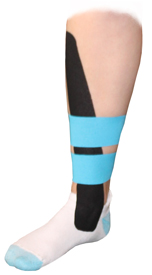
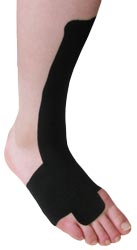
How to Tape Injuries

Taping the Ankle

Content:

Taping the ankle has become common practice amongst both professional and amateur athletes. Whether you are a runner, CrossFit enthusiast or a soccer player, you probably feel like your ankle could use some extra support and protection.

Taping the ankle helps to restrict your range of motion, making an injury like a sprain or a tear less likely than if you weren’t taped up. This is especially important if you have weak ankles or if you have an ankle that has recently been injured.

Since taping the ankle helps to prevent re-injury, you should always wear tape when doing anything physically active post-injury. If you are suffering from Achilles Tendonitis, you may find that taping up the back of your ankle gives you some peace of mind if you’re going to be spending a lot of time on your feet.

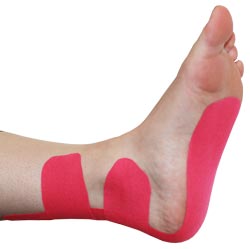
Achilles Taping

Taping Achilles Tendonitis

Option 1

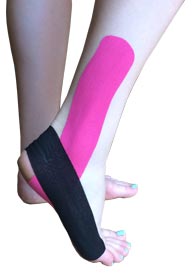
  1. Take one full length piece of tape (about 10 inches) and tear the backing off one end, anchoring it on the arch of your foot, just ahead of your heel.
  2. Pull the tape down the length of your heel and up the back of your ankle (this is called the Achilles) with 50% stretch, laying the end down with no stretch.
  3. Rub the tape in and take another full length piece, cutting it in half and rounding the corners to create two pieces that are each about 5 inches in length.
  4. Take one of the 5 inch strips and tear the backing in the middle, peeling it away so you are holding onto the two anchor ends.
  5. Place the middle portion of the tape directly over your point of pain (this could be closer to your heel or up higher on your achilles) with 80% stretch.
  6. Lay down the ends of the tape with no stretch.
  7. Rub the tape in to ensure sticking.
Achilles Tendonitis Taping

Taping Achilles Tendonitis

Option 2

  1. Take one full length piece of tape (about 10 inches) and tear the backing off one end.
  2. Using no stretch, anchor the tape to the bottom of your foot, right where your heel starts.
  3. Pull the tape up the length of your Achilles Tendon and lay it down with no stretch.
  4. Take another full length piece of tape and cut it two thirds of the way down the center to make a "Y" shape.
  5. Tear the backing off the uncut end of the strip and anchor it right over the area that you anchored the first piece, again using no stretch.
  6. Using 75% stretch, pull the "Y" arm closest to the inside of your ankle up the back of your calf, making sure not to touch the first piece of tape.
  7. Lay down the end of the tape with no stretch.
  8. Using 75% stretch, pull the other "Y" arm up the back of your calf, making sure not to touch the first piece of tape.
  9. Lay down the end of the tape with no stretch.
  10. Take one full length piece of tape and cut it in half, rounding the corners, so you have two pieces that are each about 5 inches long.
  11. Take one of the 5 inch strips and tear the backing in the middle, peeling it away so you are holding onto the two anchor ends.
  12. Apply the middle portion of the strip directly over the point of your pain with 80% stretch.
  13. Lay down the ends of the tape with no stretch.
  14. Rub the tape in to ensure sticking.
Ankle Sprain Taping

Taping an Ankle Sprain

Option 1

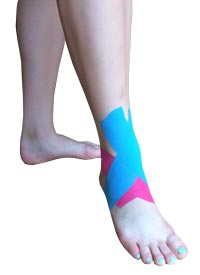
  1. Using a continuous roll of tape, measure and cut two pieces - one piece should be 12 inches and the other 16 inches.
  2. Round the corners of the tape.
  3. Take the 12" piece of tape and tear the backing in the middle, peeling it away so you are holding onto the two anchor ends.
  4. Apply the middle portion of the tape to the back of your ankle and, using 75% stretch, pull the end closest to the inside of your ankle up across the top of your ankle and foot, around to the other side.
  5. Lay down the end of the tape with no stretch.
  6. Take the end of tape closest to the outside of your ankle and, using 75% stretch, pull it up and across the top of your ankle and foot, so it makes an "X" shape with the other end of the tape.
  7. Lay down the end of the tape with no stretch.
  8. Take the 16" piece of tape and tear the backing in the middle, peeling it away so you are holding onto the two anchor ends.
  9. Apply the middle portion of the tape to the bottom of your foot, where your arch is located.
  10. Use 75% stretch to pull the end closest to the inside of your ankle up and across so it goes right under your outside ankle bone.
  11. Lay down the end of the tape with no stretch.
  12. Use 75% stretch to pull the end closest to the outside of your ankle up and across so it goes right under your inside ankle bone.
  13. Lay down the end of the tape with no stretch.
  14. Rub the tape in to ensure sticking.
Ankle Sprain Taping

Taping an Ankle Sprain

Option 2

  1. Take a full length piece of tape (about 10 inches long) and tear the backing in the midle, so you're holding onto the two anchor ends.
  2. Apply the middle section to the bottom of your foot, just above your heel, using no stretch.
  3. Peel the backing off the anchor arm closest to the inside of your ankle.
  4. Using 75% stretch, pull this anchor arm up to the ankle bone on the inside of your ankle, then angle it across the front of your ankle to the other side and around the back of your ankle.
  5. Lay down the end of the tape with no stretch.
  6. Peel the backing off the anchor arm closest to the outside of your ankle.
  7. Using 75% stretch, pull this anchor arm up to the ankle bone on the outside of your ankle, then angle it across the front of your ankle to the other side and around the back of your ankle.
  8. Lay down the end of the tape with no stretch.
  9. This should create an "X" or "cross" on the top of your foot and ankle.
  10. Rub the tape in to ensure sticking.
Peroneal Taping

Taping Peroneal Tendonitis

Option 1

  1. Position your ankle at 90°.
  2. Take one full length strip of tape (about 10 inches long) and tear the backing off one end.
  3. Using no stretch, anchor the tape on the inside of your foot, below the inside ankle bone.
  4. Using 50% stretch, pull the tape down and under the bottom of your foot, angling it so it goes up behind your outside ankle bone and the side of your leg, covering your point of pain.
  5. Lay the end of the tape down with no stretch.
  6. Take another full length strip of tape and tear the backing off one end.
  7. Using no stretch, anchor the tape on the inside of your foot, at about the midfoot point, with the rest of the strip pointing backwards towards your heel.
  8. Using 50% stretch, apply the tape below your ankle bone on the inside of your foot, wrapping it around and below the ankle bone on the outside of your foot.
  9. Lay the end of the tape down with no stretch.
  10. Rub the tape in to ensure sticking.
Peroneal Tendonitis Taping

Taping Peroneal Tendonitis

Option 2

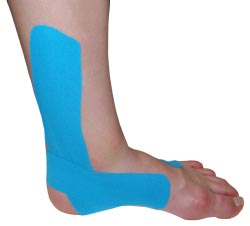
  1. Take one full length strip of tape (about 10 inches long) and tear the backing off one end.
  2. Using no stretch, anchor the tape on the inside of your heel, just below your ankle bone.
  3. Still using no stretch, pull the tape down around the underside of your heel and up to your outside ankle bone.
  4. Lay down the end of the tape with no stretch.
  5. Take another full strip of tape and tear the backing off one end.
  6. Using no stretch, anchor the tape on the outside of your foot, just below your small toe.
  7. Peel the backing off the tape and pull the tape around the back of your heel using no stretch.
  8. Pull the tape around to your inside ankle bone and lay it down with no stretch.
  9. Rub the tape in to ensure sticking.
Tibialis Anterior Tendonitis Taping

Taping the Tibialis Anterior Tendon

Option 1

NOTE: This application was applied over clothing for demonstration purposes only. When using this application, apply it directly to your skin.

  1. Take a full length piece of tape (10 inches) and tear the backing off one end.
  2. Anchor the tape just above your inside ankle bone with no stretch.
  3. Peel off the rest of the tape backing and apply the tape up the front of your shin using 25% stretch.
  4. Lay down the end of the tape with no stretch.
  5. Take a half piece of tape (5 inches) and tear the backing in the middle, peeling it away so so you are holding onto the two anchor ends.
  6. Apply the tape horizontally over your point of pain with 100% stretch in the middle and no stretch at the ends.
  7. Take another 5 inch strip and tear the backing in the middle, peeling it away so so you are holding onto the two anchor ends.
  8. Take the 5 inch strip and cross over the other 5 inch strip to create an "X", again using 100% stretch in the middle and no stretch at the ends.
  9. Rub the tape in to ensure sticking.
Tibialis Anterior Tendonitis Taping

Taping the Tibialis Anterior Tendon

Option 2

NOTE: This application was applied over clothing for demonstration purposes only. When using this application, apply it directly to your skin.

  1. Take a full length piece of tape (10 inches) and tear the backing off one end.
  2. Anchor the tape just ahead of your inside ankle bone with no stretch.
  3. Angle the tape towards the front of your shin and apply it using 80% stretch.
  4. Lay down the end of the tape with no stretch.
  5. Take one full length piece of tape (about 10 inches) and cut it in half, rounding the corners, so you have two pieces that are each about 5 inches in length.
  6. Take one of the 5 inch strips and tear the backing in the middle, peeling it away so so you are holding onto the two anchor ends.
  7. Using 25% stretch in the middle and no stretch at the ends, apply the tape horizontally over your point of pain.
  8. Follow Step 7 for any additional points of pain.
  9. Rub the tape in to ensure sticking.
Ankle Extensor Tendonitis Taping

Extensor Tendonitis Taping

- Ankle

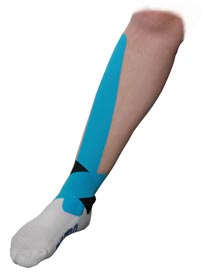
  1. Take a full length piece of tape (10 inches) and cut it in half, rounding the corners, so you have two pieces that are each about 5 inches long.
  2. Take one of the 5 inch pieces of tape and tear the backing in the middle, peeling it away so you are holding onto the two anchor ends.
  3. Apply the tape horizontally over the point of pain on the top of your foot, using 50% stretch in the middle and no stretch at the ends.
  4. Take the other 5 inch strip of tape and tear the backing in the middle, peeling it away so you are holding onto the two anchor ends.
  5. Apply the tape horizontally right above and overlapping with the first piece of tape you applied to ensure the entire painful area is covered, using 50% stretch in the middle and no stretch at the ends.
  6. Take a full length piece of tape and tear the backing off one end.
  7. Anchor the tape in front of the first two pieces of tape (right below your toes) using no stretch.
  8. Using 50% stretch, apply the tape up the top of your foot and ankle to your shin.
  9. Lay down the end of the tape with no stretch.
  10. Rub the application in to ensure it sticks.