How to Tape Injuries

Taping the Back & Hips

Content:

Whether you have lower back pain, an IT Band injury or a hip flexor strain, taping can help provide support for your muscles, tendons and ligaments. The best way to go about taping your back and/or hip(s) is to tape the area that feels painful.

When you apply tape to your skin, it makes the skin more rigid and provides outside support for your soft tissue. Tape may be most effective when worn during activities that cause strain and pain. For example, sitting and working at a desk, lifting heavy objects, etc.

Taping your back can help to improve your posture and reduce tension. If you engage in exercise or sports, make sure you tape your back beforehand. This will decrease your risk of re-injury if you have soft tissue damage.

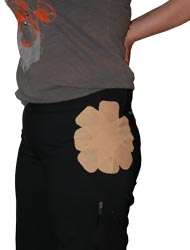
IT Band Hip Taping

Taping The IT Band

- Hip

NOTE: This application was applied over clothing for demonstration purposes only. When using this application, apply it directly to your skin.

  1. Take a full length piece of tape (about 10 inches long) and cut it in half, rounding the corners, so you have two pieces that are each about 5 inches long.
  2. Take one of the 5 inch strips and tear the backing in the middle, peeling it away so you are holding onto the two anchor ends.
  3. Using 80% stretch, apply the middle portion of the tape vertically over the point of pain on your hip.
  4. Lay down the ends of the tape with no stretch.
  5. Take the other 5 inch strip and tear the backing in the middle, peeling it away so you are holding onto the two anchor ends.
  6. Using 80% stretch, apply the middle portion of the tape horizontally over the point of pain on your hip to create a cross shape with the other piece.
  7. Lay down the ends of the tape with no stretch.
  8. Take another full length piece of tape and cut it in half, rounding the corners, so you have two pieces that are each about 5 inches long.
  9. Take one of the 5 inch strips and tear the backing in the middle, peeling it away so you are holding onto the two anchor ends.
  10. Using 80% stretch, apply the middle portion of the tape diagonally across the other two pieces
  11. Lay down the ends of the tape with no stretch.
  12. Take the other 5 inch strip and tear the backing in the middle, peeling it away so you are holding onto the two anchor ends.
  13. Using 80% stretch, apply the middle portion of the tape diagonally over your point of pain, to form an "X" with the previous piece you applied.
  14. Lay down the ends of the tape with no stretch.
  15. Rub the tape in to ensure sticking.
Low Back Taping

Taping the Back

Option 1: Lower Back

  1. Take a full length piece of tape (about 10 inches long) and tear the backing in the middle, peeling it away so you are holding onto the two anchor ends.
  2. Using 80% stretch, apply the middle portion of the tape tape horizontally over the point of pain on your lower back.
  3. Lay down the ends of the tape with no stretch.
  4. Take another full length piece of tape and tear the backing in the middle, peeling it away so you are holding onto the two anchor ends.
  5. Using 80% stretch, apply the middle portion of the tape directly below the first piece of tape you applied.
  6. Lay down the ends of the tape with no stretch.
  7. Rub the tape in to ensure sticking.
Mid Back Taping

Taping the Back

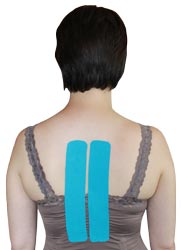
Option 2: Mid Back

NOTE: This application was applied over clothing for demonstration purposes only. When using this application, apply it directly to your skin.

  1. Take a full length piece of tape (about 10 inches long) and tear the backing off one end.
  2. Anchor the tape vertically just below the point of pain on your back.
  3. Remove the rest of the backing and, using 25% stretch, apply the tape up the length of your back.
  4. Lay down the end of the tape with no stretch.
  5. Take another full length piece of tape and tear the backing off one end.
  6. Anchor the tape vertically right beside the other piece of tape.
  7. Remove the rest of the backing and, using 25% stretch, apply the tape up the length of your back, making sure not to overlap with the other strip.
  8. Lay down the end of the tape with no stretch.
  9. Rub the tape in to ensure sticking.
Hip Flexor Taping

Taping the Hip Flexors

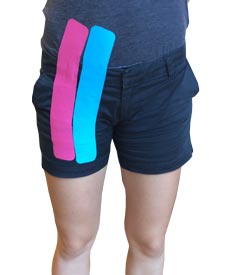
Option 1

NOTE: This application was applied over clothing for demonstration purposes only. When using this application, apply it directly to your skin.

  1. Take a full length piece of tape (about 10 inches long) and measure it from the point of pain on your hip down the length of your thigh.
  2. Tear the backing off the thigh end of the tape and anchor it to the front of your thigh with no stretch.
  3. Peel the rest of the backing away from the tape and use 25% stretch to apply the tape up the length of your hip to cover the point of your Hip Flexor pain.
  4. Lay down the end of the tape on your stomach using no stretch.
  5. Take another full length piece of tape and tear the backing off one end.
  6. Using no stretch, anchor the tape directly to the inside of where the first piece was anchored, making sure the two pieces don't touch.
  7. Peel the rest of the backing away from the tape and use 25% stretch to apply the tape up the length of your hip.
  8. Lay down the end of the tape on your stomach, using no stretch.
  9. Rub the tape in to ensure sticking.
Hip Flexor Taping

Taping the Hip Flexors

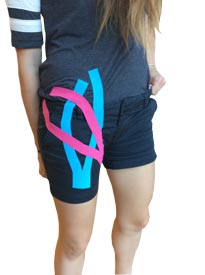
Option 2

NOTE: This application was applied over clothing for demonstration purposes only. When using this application, apply it directly to your skin.

  1. Take a full length piece of tape (about 10 inches long) and cut it two thirds of the way down the center to make a "Y" shape.
  2. Tear the backing off the un-cut end of the tape and anchor it about 3 inches below your point of pain with no stretch.
  3. Remove the backing from the two arms and, using 25% stretch, apply them directly around the point of your pain, but not over it.
  4. Take another full length piece of tape and cut it two thirds of the way down the center to make a "Y" shape.
  5. Tear the backing off the un-cut end of the tape and anchor it on the inside portion of your thigh, diagonal to your point of pain, using no stretch.
  6. Peel the backing off the two arms of tape and, using 25% stretch, apply them directly around the point of pain, but not over it.
  7. Rub the tape in to ensure sticking.