How to Tape Injuries

Taping the Shoulder

Content:

The shoulder is one of the joints in the body that is most prone to injury and strain. This could be due to overuse because of a particular sport or activity at your workplace, or it could be a one-time injury from a fall or direct hit.

Applying tape to the affected area of your shoulder will provide you with extra support and protection, whenever you need it. Wearing tape during the activities that cause pain and stress on your shoulder is important. The tape acts as a barrier and helps to prevent re-injury of the soft tissue (your muscles, tendons and ligaments).

We have taping applications for the AC Joint, Rotator Cuff, Deltoid and Bicep. No matter where your shoulder problem is located, there is a taping application designed to help.


Bicep Taping

Taping Bicep Tendonitis

Option 1

  1. Stretch the affected arm out to the side of your body.
  2. Take a full length piece of tape (about 10 inches long) and tear the backing off one end, anchoring it just above the inside of your elbow with no stretch.
  3. Using 25% stretch, pull the tape up along the length of your bicep and lay it down using no stretch.
  4. Rub the tape in to ensure sticking.
Bicep Tendonitis Taping

Taping Bicep Tendonitis

Option 2

  1. Stretch the affected arm out to the side of your body.
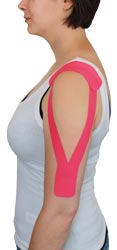
  2. Take a full length piece of tape (about 10 inches long) and cut it two thirds of the way down the center to make a "Y" shape.
  3. Tear the backing off the un-cut end and anchor it to the inside of your elbow joint (this is the insertion point of the biceps muscle) with no stretch.
  4. Peel the backing off the outer arm and, using 25% stretch, pull it up the tendon towards the top of the shoulder, laying it down with no stretch.
  5. Peel the backing off the inner arm and, using 25% stretch, pull it up the inside of your arm and towards the top of your shoulder, making sure it doesn't touch the other arm.
  6. Lay down the end of the tape with no stretch.
  7. Take a full length piece of tape and cut it in half, rounding the corners so you have two pieces that are each about 5 inches long.
  8. Take one of the 5 inch strips and tear the backing in the middle so you are holding onto the two anchor ends.
  9. Using 25% stretch, apply the middle of the tape to your main point of pain.
  10. Lay down the ends of the tape with no stretch and rub the tape in to ensure sticking.
Rotator Cuff Taping

Taping The Rotator Cuff

Option 1

NOTE: This application was applied over clothing for demonstration purposes only. When using this application, apply it directly to your skin.

  1. Take one full length strip of tape (about 10 inches long) and remove the backing on one end.
  2. Anchor the tape just below the bone that protrudes from the side of your shoulder, using no stretch.
  3. Pull the tape towards the back of your shoulder using 25% stretch, going just below where the top of the shoulder blade protrudes.
  4. Lay the end of the tape down with no stretch.
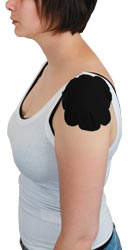
  5. Take another full length strip of tape and cut it in half, rounding the corners, so you have two pieces that are each about 5 inches long.
  6. Take one of the 5 inch strips and tear the backing in the middle, peeling it away so you are holding onto the two anchor ends.
  7. Apply one of the 5 inch strips vertically along the side of your shoulder, using 80% stretch in the middle and no stretch at the ends.
  8. Apply the other 5 inch strip vertically right beside the one you just applied, but closer to your shoulder blade, using 80% stretch in the middle and no stretch at the ends.
  9. Rub the tape in to ensure sticking.
Rotator Cuff Taping

Taping The Rotator Cuff

Option 2

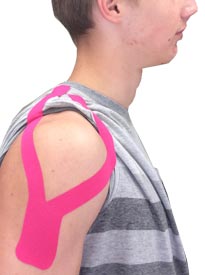
  1. Take one full length piece of tape (about 10 inches long) and cut it two thirds of the way down the center to make a "Y" shape.
  2. Tear the backing away from the un-cut end and anchor it just above your elbow on the outside of your arm.
  3. Remove the backing from the "Y" arm that's closest to your chest and use 50% stretch to apply it up your arm and to the inside line of your shoulder, around to the top.
  4. Lay the end of the strip down with no stretch.
  5. Take the other "Y" arm and use 50% stretch to pull it up your arm and outline the back of your shoulder (deltoid), laying down the end of the strip with no stretch.
  6. Take a full length strip of tape and cut it in half, rounding the corners, so you have two pieces that are each about 5 inches long.
  7. Take one of the 5 inch strips and tear the backing in the middle, peeling it away so you are holding onto the two anchor ends.
  8. Place the tape across the top of your shoulder using 50% stretch in the middle and no stretch at the ends.
  9. Rub the tape in to ensure sticking.
  10. If the split "Y" piece of tape doesn't provide enough support, use 2 full length pieces of tape, creating the "Y" by following the same pattern and technique described above.
AC Joint Taping

Taping The AC Joint

Option 1

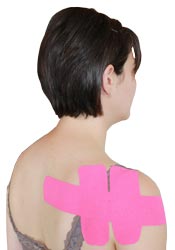
  1. Take one full length strip of tape (about 10 inches long) and cut it in half, rounding the corners, so you have two pieces that are each about 5 inches long.
  2. Take one of the 5 inch strips and tear the backing in the middle, peeling it away so you are holding onto the two anchor ends.
  3. Using 80% stretch in the middle and no stretch at the ends, apply the tape horizontally over your point of pain.
  4. Take the other 5 inch strip and tear the backing in the middle, peeling it away so you are holding onto the two anchor ends.
  5. Using 80% stretch in the middle and no stretch at the ends, apply the tape vertically over your point of pain to form a "cross" shape with the first piece.
  6. Take another full length strip of tape and cut it in half, rounding the corners, so you have two pieces that are each about 5 inches long.
  7. Take one of the 5 inch strips and tear the backing in the middle, peeling it away so you are holding onto the two anchor ends.
  8. Using 80% stretch in the middle and no stretch at the ends, apply the tape horizontally through the middle of the other two pieces.
  9. Take the other 5 inch strip of tape and tear the backing in the middle, peeling it away so you are holding onto the two anchor ends.
  10. Using 80% stretch in the middle and no stretch at the ends, apply the tape vertically down the center of the other three pieces.
  11. Rub the tape in to ensure sticking.
AC Joint Taping

Taping The AC Joint

Option 2

NOTE: This application was applied over clothing for demonstration purposes only. When using this application, apply it directly to your skin.

  1. Take one full length piece of tape (about 10 inches long) and measure it from your point of pain up to just below your hairline.
  2. Tear the backing off one end of the tape and, using no stretch, anchor it right below your hairline.
  3. Using no stretch, peel the rest of the backing off the tape and apply it down the length of your neck and shoulder, right over your point of pain.
  4. Lay down the end of the tape with no stretch.
  5. Take another full length piece of tape and cut it in half, rounding the corners, so you have two pieces that are each about 5 inches long.
  6. Take one of the 5 inch strips and tear the backing in the middle, peeling it away so you are holding onto the two anchor ends.
  7. Using 50% stretch in the middle and no stretch at the ends, apply the tape horizontally over your point of pain.
  8. Rub the tape in to ensure sticking.
Deltoid Taping

Taping The Deltoid

Option 1

NOTE: This application was applied over clothing for demonstration purposes only. When using this application, apply it directly to your skin.

  1. On the side of your shoulder, look for the outline of your deltoid muscle.
  2. Take one full length strip of tape (about 10 inches long) and tear the backing off one end.
  3. Using no stretch, anchor the tape at the insertion point of your deltoid.
  4. Peel the rest of the backing off the tape.
  5. Using 25% stretch, pull the tape up to outline your deltoid.
  6. Once you reach the top of the shoulder, ease the tension off and lay the end down with no stretch.
  7. Take another full length piece of tape and tear the backing off one end.
  8. Using no stretch, anchor the tape in front of and a bit below where the first piece was anchored.
  9. Using 25% stretch, pull the tape up towards the top of your shoulder.
  10. Once you reach the top of the shoulder, ease the tension off and lay the end down with no stretch.
  11. Rub the tape in to ensure sticking.
Deltoid Taping

Taping The Deltoid

Option 2

Option 2

NOTE: This application was applied over clothing for demonstration purposes only. When using this application, apply it directly to your skin.

  1. On the side of your shoulder, look for the outline of your deltoid muscle.
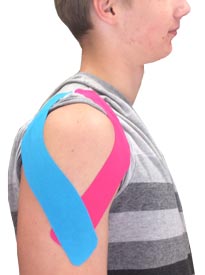
  2. Take one full length strip of tape (about 10 inches long) and cut it two thirds of the way down the center to make a "Y" shape.
  3. Tear the backing away from the un-cut end and anchor it at the insertion point of your deltoid.
  4. Remove the backing from the "Y" arm that's closest to your chest and use 50% stretch to apply it up your arm and to the inside line of your shoulder, around to the top.
  5. Lay the end of the strip down with no stretch.
  6. Take the other "Y" arm and use 50% stretch to pull it up your arm and outline the back of your shoulder (deltoid), making sure not to overlap with the other "Y" arm.
  7. Lay down the end of the tape on the top of your shoulder with no stretch.
  8. Rub the tape in to ensure sticking.