How to Tape Injuries

Taping the Neck

Content:

Neck pain and strains can be difficult to treat, but taping can provide you with some relief. Tape can help your neck feel more supported and provides light compression. Whether it’s the back, side or front of your neck, there are taping applications that can help.

Neck pain may be related to a shoulder injury, which is why we have included applications that involve the shoulder as well. While tape is designed to be applied any time, it’s most important if you’re planning on doing something physically active.

If you think you may do an activity that could strain your neck, make sure you apply tape beforehand. It acts as a support from the outside to prevent damage to the soft tissue deep below your skin. Please keep reading for step-by-step application instructions.
Neck Taping

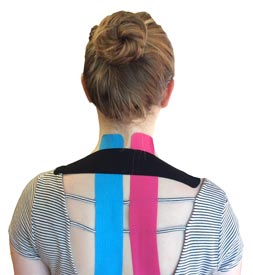
Taping the Back of the Neck

Option 1

NOTE: This application was applied over clothing for demonstration purposes only. When using this application, apply it directly to your skin.

  1. Take a full length piece of tape (about 10 inches long) and tear the backing off one end.
  2. Using no stretch, anchor the tape to the right of your spine, 4 inches below your hairline on the back of your neck.
  3. Peeling the rest of the backing off, use 25% stretch to pull the tape up your back to your neck.
  4. Lay down the end of the tape with no stretch.
  5. Take another full length piece of tape and tear the backing off one end.
  6. Using no stretch, anchor the tape to the left of your spine, 4 inches below your hairline on the back of your neck.
  7. Peeling the rest of the backing off, use 25% stretch to pull the tape up your back to your neck, ensuring that it doesn't touch the first piece you applied.
  8. Take a third full length piece of tape and tear the backing in the middle, peeling it away so you are holding onto the two anchor ends.
  9. Using 80% stretch, apply the middle portion of the tape horizontally over the point of your pain.
  10. Peel off the rest of the backing and lay down the ends of the tape with no stretch.
  11. Rub the tape in to ensure sticking.
Neck Taping

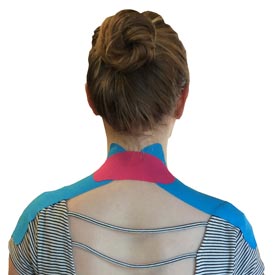
Taping the Back of the Neck

Option 2

NOTE: This application was applied over clothing for demonstration purposes only. When using this application, apply it directly to your skin.

  1. Take a full length piece of tape (about 10 inches long) and tear the backing off one end.
  2. Anchor the tape on your right side, directly below your hairline on the back of your neck.
  3. Peeling the rest of the backing off, use no stretch to apply the tape down the length of your neck, traps and top of your shoulder.
  4. Lay down the end of the tape with no stretch.
  5. Take another full piece of tape and tear the backing off one end.
  6. Anchor the tape on your left side, directly below your hairline on the back of your neck.
  7. Peeling the rest of the backing off, use no stretch to apply the tape down the length of your neck, traps and top of your shoulder.
  8. The second piece should be a mirror image of the first.
  9. Take a full length piece of tape and cut it in half, rounding the edges so you have two pieces that are each about 5 inches long.
  10. Take one of the 5 inch strips and tear the backing in the middle, peeling it away so you are holding onto the two anchor ends.
  11. Using 50% stretch, apply the middle portion of the tape horizontally to the back of your neck, wherever the pain is most prominent.
  12. Peel the rest of the backing away and lay down the ends of the tape with no stretch.
  13. Rub the tape in to ensure sticking.
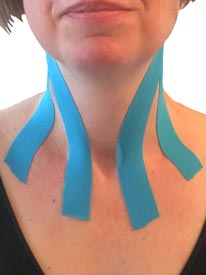
Front Neck Taping

Taping the Front of the Neck

  1. Take one full length piece of tape (about 10 inches) and and cut it down the middle until there is about 2 inches of uncut tape left at the end
  2. This should create two Y-arms, which need to be rounded off at the ends
  3. Tear the backing off the end of the tape that's not cut and anchor it to the area of your neck just below the back of your ear, using no stretch
  4. Peel the backing off the upper Y-arm and apply it down below your jaw and chin to the front of your neck using 50% stretch in the middle and no stretch at the end
  5. Peel the backing off the lower Y-arm and apply it down below your jaw and chin to the front of your neck using 50% stretch in the middle and no stretch at the end
  6. The ends of the two Y-arms should be resting on the top of your clavicle
  7. Rub the tape in to ensure it sticks
  8. Repeat Steps 1-8 for the other side of your neck (if needed)
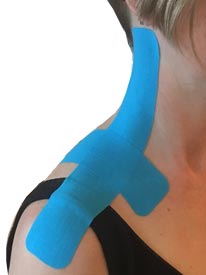
Side Neck Taping

Taping the Side of the Neck

Option 1

NOTE: This application was applied over clothing for demonstration purposes only. When using this application, apply it directly to your skin.

  1. Take one full length piece of tape (about 10 inches) and tear the backing off one end
  2. Anchor the tape directly behind your earlobe using no stretch
  3. Apply the tape down the length of the side of your neck using no stretch
  4. Lay the end of the tape down over your shoulder, again using no stretch
  5. Take another full length piece of tape and cut it in half so you have two pieces that are each about 5 inches long
  6. Take one of the 5 inch strips and anchor it to the front of your clavicle using no stretch
  7. Pull the tape horizontally over the back of your shoulder and lay down the end with no stretch
  8. Rub the tape in to ensure it sticks
  9. Repeat Steps 1-8 for the other side of your neck (if needed)